Create Transparent Stylized Buttons using CorelDRAW - If you’ve found yourself wishing that you knew how to create those cool, glass-like transparent buttons popular in certain interface designs, your wish is granted. I’m talking about those pill-shaped buttons that appear to be made from colored glass or see-though plastic. In this tutorial, I’ll show you how to use CorelDRAW to create glass objects like these:
At first glance, the effect looks like something created with expensive 3D modeling software, but the truth is, you can come very close to illustrating the same effect by using just two or three carefully adjusted vector shapes. Although this tutorial showcases the CorelDRAW 12 interface, virtually any recent version of CorelDRAW can be used to follow the steps and use these illustration techniques.
Create a Clear Glass Orb
Glass effects are influenced by such key factors as lighting direction, light intensity, reflection, focus, and color. In any solid transparent object, the color is darker at the outer edges than in the middle. Soft overhead lighting bounces off the shiny surface of the glass, creating a reflection of the light source. The more focused the reflection, the smoother the surface will be.
Using CorelDRAW to simulate glass effects involves carefully applying your vector objects with color and transparency effects. To demonstrate how color and lighting influence the effect, let’s start with the simple creation of a colored glass object:
1. Using the Ellipse Tool draw a circle that is roughly 2 inches in diameter. Holding the Ctrl key constrains the ellipse shape to a circle.
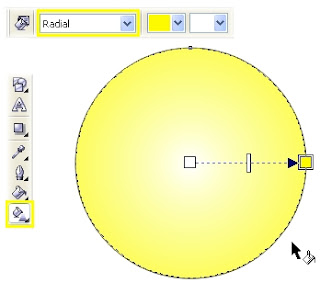
2. For a color mode, use the default CMYK palette. If the color palette isn’t in view, you can display it by choosing Window > Color Palettes > Default CMYK palette. With the circle still selected, click the Yellow well (C0, M0, Y100, K0) to set the circle’s fill color. Choose the Interactive Fill tool (shortcut key G), and use the property bar options to set the Fill Type to Radial (see below).
3. For precise adjustment of the fountain fill colors and color positions in this example, I recommend using the Fountain Fill dialog (press F11). To specify your fountain colors, click the Custom radio button. Click the far left (0 percent position) color marker (it’s black when selected), and click the Others button to access more color options. Set the CMYK values to C40, M50, Y100, K20. Set the far right (100 percent position) color marker to C0, M0, Y100, K0. Double-click to add two more color markers at 25 percent and 80 percent, and set these to C0, M5, Y100, K20 and C0, M0, Y100, K0, respectively (as shown below).
4. To finish the color effect, set the Edge Pad option on the Property Bar to 5 percent, and remove any outline properties applied to the circle by right-clicking the None color well in the onscreen color palette. Your custom fill is now complete (see below).
5. For the reflection effect, create a second circle that’s roughly 1.5 inches in diameter, fill it with white, and position it to be centered and slightly below the top of the first circle. With the circle still selected, choose the Interactive Transparency Tool and drag from the top to the bottom of the shape. Remove any outline from the new circle.
6. Position the white, black, and midpoint nodes of the transparency slider precisely, as shown below. Drag the black marker to the center of the yellow circle, drag the white marker slightly below the circle’s top edge, and drag the midpoint marker upward, three quarters of the way between the two.
With just two objects, you’ve created a realistic-looking glass object. Note that the custom colors I specified provide the illusion that the edges of the shape let less light through than the middle portion, giving the shape the impression of flatness. The more pronounced the darkened edges are, the flatter the shape appears to be.
The same steps can be used to turn virtually any simple shape into glass. Just keep in mind that you need to pay close attention to both the custom fountain fill and the transparency marker positions for the effect to appear realistic.
Draw More Glassy Buttons
The same basic effect can be used to simulate the cool 3D appearance of glass pill-shaped buttons. The steps involve rounding the corners of a rectangle filled with a specific linear fountain fill and applying resized white copies of the rectangle with transparency to simulate the reflection. Although there are several ways to construct glass pill-shaped buttons, this method is perhaps the quickest and uses the fewest shapes:
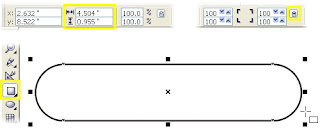
1. Using the Rectangle Tool (F6), draw a rectangle roughly 1 inch high by 4.5 inches wide. (Use different proportions for larger or smaller text button labels if needed.)
2. With the rectangle selected, use the Rectangle Corner Roundness and Round Corners Together options on the Property Bar to round all four corners by 100 percent, as shown below. You can also do this interactively by using the Shape Tool (F10).
Note: To preserve the symmetry of your rounded rectangle corners, create the shape at the exact size you need it to be instead of adjusting it vertically or horizontally through scaling. Scaling operations affect the proportions of rounded rectangle corners.
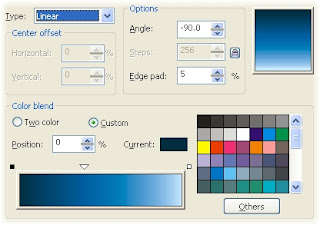
3. Choose the Interactive Fill Tool and drag vertically from the top to the bottom of the shape to apply a default linear fountain fill. To add colors at precise points, open the Fountain Fill dialog (F11), and click Custom. In this example, I’ve used a cyan blue color scheme. Set the 0 percent marker to C100, M20, Y0, K80 and the 100 percent marker to C10, M0, Y0, K0. Add a third color marker at the 40 percent position, and set it to C100, M20, Y0, K20 (as shown below). Before closing the dialog, set the Edge Pad option to 5 percent. Remove any outline properties from the shape.
4. Create a second rectangle roughly 0.4 inches high (slightly less than half an inch) by 4 inches wide, and round the corners by 100 percent. Fill the new rectangle with white, remove any outline properties, and position it to center vertically with the first rectangle and slightly below the top edge (see below).
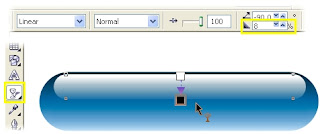
5. Choose the Interactive Transparency Tool and drag vertically from the top edge to the bottom of the white rectangle to apply a default linear transparency effect (see below). Use the Property Bar to set the Edge Pad value to 8 percent.
6. Choose the Pick Tool and duplicate the transparent rectangle by pressing the plus sign (+) key on your numeric keypad. Scale this new copy by dragging the center-bottom handle downward to just above the bottom edge of the arrangement. Set the fill color of this new object to 100 percent Cyan by clicking the Cyan well in the onscreen color palette.
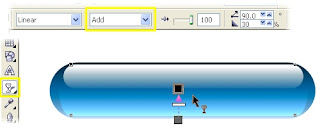
7. Choose the Interactive Transparency Tool and drag upward vertically from slightly below the bottom edge to a point halfway up the shape’s height. To soften the effect slightly, drag from your CMYK palette 60 percent black well onto the white transparency marker. To complete the effect, set the Transparency Operation option on the Property Bar to Add. Select, and group your objects together (Ctrl+G). The button is virtually complete (see below).
Although this example uses a blue theme, you can customize it to virtually any color theme you wish by editing each of the four color markers of the custom fountain fill to create variations (see below).
As an alternative to creating a custom color fill button, you can apply a lens effect to create the illusion of clear glass distorting an underlying surface pattern (see below). To do this, first create a larger rectangular shape to serve as a background for the button. In this example, a bitmap fill was used. To apply a bitmap fill to any selected object, choose the Interactive Fill Tool and set the Property Bar Fill Type option to Bitmap Pattern. Create your rounded rectangle shape for the button on top of the background, then open the Lens docker (Alt+F3), and choose Fish Eye. Increase the Rate option to distort the underlying surface, and click the Apply button. The higher the rate, the more distortion is applied. After applying the lens to the first shape, create and align the two smaller rounded rectangle shapes, set their fill color to white, and apply a transparency (top to bottom for the smaller shape, bottom to top for the bigger shape) to create the fountain effect.
Add artistic text to your buttons by using the Text tool. Set your text to a centered alignment. If you select the text and the grouped button shapes, you can use the alignment hot keys in CorelDRAW to center-align the text and the button group vertically (press C) and horizontally (press E). If you need to create multiple buttons with different text but the same design, you can use this first version as a template (see below).
Create Button Rollover States
To make the button interactive, you can add a realistic rollover effect. Because you’re simulating the effect of three-dimensional objects with realistic lighting, adding shadows is the next logical step. In these next steps, we’ll use the Internet Toolbar to convert the button to a rollover and edit the button states.
1. Using the button design you created in the previous step sequence, choose the Pick Tool, and ungroup (Ctrl+U) the button shapes you grouped together in the previous steps.
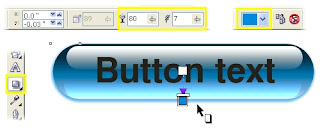
2. Choose the Interactive Drop Shadow Tool, and click your pill-shaped rectangle. Hold Ctrl, and drag from the center of the shape downward to apply a drop shadow at default settings. Use the Property Bar options to set the shadow X offset to 0 and the Y offset to –0.03 inches (a negative value). Set your Drop Shadow Opacity to 80 and the Feathering to 7. Set the shadow color to the base color of your button — in this case, cyan (see below).
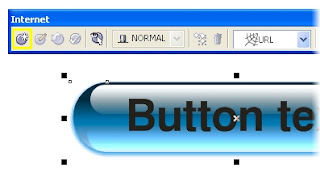
3. Select all objects in the arrangement, and open the Internet Toolbar by choosing Window > Toolbars > Internet. Click the Create Rollover button (shown below) to convert the entire button arrangement into a rollover button. Be sure the Live Preview of Rollovers button is toggled to the “off” state.
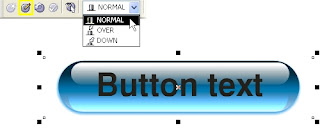
4. Click the Edit Rollover button on the Internet toolbar to set the active rollover state to Normal, as indicated by both the toolbar option and the page tabs at the bottom of your document window (see below). We’ve already created the basic button, so we’re going to leave the Normal state unchanged.
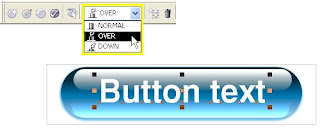
5. To switch to the mouse-over state, choose Over from the Active Rollover State selector on the Internet Toolbar. Select your button text, and change its color. In my case, I’ve simulated a brightening effect by changing the text fill from black to white, as shown below.
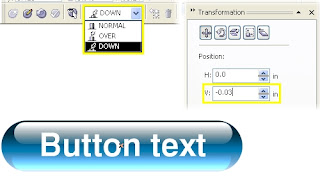
6. Switch to the mouse-down editing state by choosing Down from the Active Rollover State selector. Using the Pick Tool, click to select the drop shadow, and choose Effects > Clear Drop Shadow to remove it.
7. While still in the Down editing state, select all objects in the arrangement, and open the Transformation docker to the Position tab by choosing Arrange > Transformations > Position (Alt+F7). Enter 0 in the H box and -0.03 in the V box (see below), and click the Apply button. This action offsets the entire button by the same offset as the shadow.
8. Close the Transformation docker, and click the Finish Editing Rollover button on the Internet Toolbar. Your rollover is complete.
Temporarily activate the rollover preview by toggling the Live
Preview of Rollovers button to the “on” state, and test-drive your new
rollover button. Passing your cursor over the button causes the text
label to change color. When clicked, the button is offset vertically,
and the shadow is displaced.
To view or examine the final results of the buttons and effects applied in this tutorial, download this zipped Button Sample file saved in CorelDRAW version 12 format.






No comments
Your Comment Here..!