How to Remove Wrinkles in Photoshop
Summary:
In this tutorial, we will be discussing how to use the Spot Healing Brush, Healing Brush, and the Patch tool. Even though these 3 tools are commonly thought of removing wrinkles, age spots, acne, scars, or even moles, these tools can be used for any image to help it blend better. We will show you that the Spot Healing Brush is very easy to use, but the Healing Brush allows you more flexibility when fixing images. We hope you enjoy this tutorial and the many other tutorials on our site that help you learn Photoshop quicker and easier.
Currently we are using Windows Vista Home Premium 64 Bit and the Photoshop CS4 Extended 64 Bit version.
Knowledge You Need to Know:
If you are unfamiliar with certain areas that are not covered in this tutorial, feel free check out other tutorials on our website. We have many different types of tutorials that can be downloaded (Video, PDF) or viewed online that will train you for free! Once you have the knowledge, feel free to come back and go through this tutorial again.
Preparing For This Tutorial:
This is image of an older man was taken last year and one of the requests was to make him look more youthful. To download this image, please scroll to the bottom the post and Left click the image for the “Click Picture To Download Supporting Files” and download the image. Please open the image PE-MAN in the Photoshop Program. Duplicate the background layer and hide the background layer.
Overview:
It is very easy to remove wrinkles and flaws of the skin. The hard part is knowing when to stop. If you use these tools too much, the areas will begin to look fake! Between these 3 tools alone, you can make a person look younger, quickly! There are other tools in Photoshop that will smooth the skin, but we think when you see the results from these 3 tools, you will go “WOW, that is pretty cool”.
All of these 3 tools are meant to fix small problems. They are not meant to fix a whole image!
Spot Healing Brush Tool:
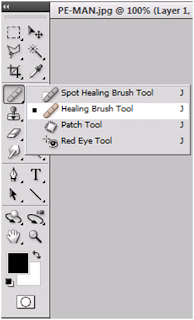
The Spot Healing Brush Tool automates the Healing Brush Tool. This tool will brush sampled pixels from an area (tries to match texture, lighting, transparency and shading, etc.). Overall it does a good job with healing, but it does not give you the advantage of selecting the source area like the Healing Brush does. On a 2 column toolbox, 4 down on the left hand side you will find all the tools that we will be talking about today. Right click this tool in the toolbox and Left click the “Spot Healing Brush Tool” command. Photoshop Tip – To use the last active tool, use the keyboard shortcut of “J”.
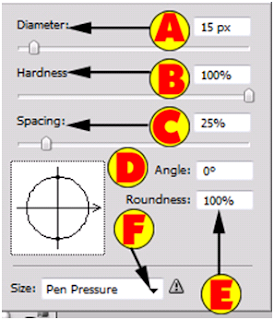
Before we get into the options, let’s take a look at the different brush options. Left click the brush option to display the choices.
A). We have talked about the Diameter before and it is the size of the brush.
B). Hardness has been talked about before and it is how strong the brush is (blurred or hard).
C). The Spacing allows you to make strokes that are noncontiguous as you heal. Increase this to add spacing or skips.
D). The Angle works with the Roundness value to rotate the brush shape.
E). The Roundness option allows you to specify whether a brush is round. 100% equals a full brush.
F). Use the Size: option ONLY if you are using a pressure sensitive tablet.
he “Navigator” palette will be your friend when working on either removing age spots and wrinkles, moles or any other area that you want to remove from the skin. This tutorial we will be talking about removing age spots and wrinkles, but all the tools can be used for any project, not just the skin. Use the Navigator to pan and zoom into the face area. Photoshop Tip – Pick a small section of the skin that you want to work on. When you are done with the section, zoom out and confirm it looks good. You will know see the options bar located at the top of the screen.
A). We talked about the Brush tool options on the previous page of this document.
B). Mode is a pre-programmed feature within Photoshop. We will be covering all modes in a future tutorial. On either the Spot Healing Brush or the Healing Brush tools, you can select “Replace” if you strictly want to replace the areas. For this tutorial, please make sure it is set to “Normal”.
C). There are 2 different Types 1). Proximity Match and 2). Create Texture. Proximity Match is the best choice because it samples the textures, shades, and colors of an area. Make sure that the radio box is selected for Proximity Match.
D). We do not want to Sample All Layers, so make sure this is unchecked. If it is checked, Photoshop will try to sample all the shading, colors, etc. from other layers.
In this tutorial, we are going to remove the age spots towards the right hand side of the face, towards the ear area. See the image below on the specific area we are talking about.
It is time to use this tool. The key to using the tool is to not drag the mouse too far (smaller areas = better). Ok, move the mouse to one of the age spots. Hold down the Left mouse button and drag. It is recommended that you do one age spot at a time. Once you are done with that age spot, release the Left mouse button. The example below looks better (not perfect, but on a full screen image, you would not be able to tell it was fixed). For perfection, either go over it again or review the next section that talks about the “Healing Brush Tool”.
Healing Brush Tool:
The Healing Brush Tool is basically the Spot Healing Brush tool but it allows you to select the area that you want to sample. Right click on the tool in the toolbox and Left click the “Healing Brush Tool”.
Let’s go over the options for the Healing Brush Tool.
A). We talked about the brush options in the previous section. Please refer to this section for more information.
B). The mode is a pre-programmed feature within the Photoshop program. In the future, we will be having a tutorial strictly on modes.
C). Normally the Source will be “Sampled”, but you could change the source to a “Pattern”. On this tutorial, make sure that the radio button is set to “Sampled”.
D). If you selected “Pattern” from C). then you would be allowed to change the pattern in this box.
E). If you set the Aligned option on, it will use the same offset for each stroke. For this example, please make sure that it is turned off (unchecked).
F). Very similar to “Sample All Layers”, except, that it gives you 3 options 1). Current Layer, 2). Current & Below, 3). All layers. For this tutorial, please make sure that it is set to “Current Layer”.
Right underneath the ear area on the right hand side, you will notice some wrinkles. Here is the area we will be working on.
So how do you use the Healing Brush Tool? Move your mouse to an area that is similar in shade that you want to sample. Hold down the ALT key and you will notice the pointer changes to a crosshair pointer. Now single Left click the sample area. Release the ALT key. Now you are all set to use the Healing Brush. Move the mouse to one of the wrinkles and then hold down the Left mouse button and drag. Make short strokes and release the Left mouse button. As you move along, change your sample area (repeat the steps from above).
It does not look perfect, but hopefully by know you understand how to use the Healing Brush. Please note it will look better when you zoom out.
Patch Tool:
The Patch tool can be used 2 different ways: 1). Source – This Tells Photoshop to start with by selecting the bad area first. 2). Destination - Tells Photoshop to start with the good area that you want to sample from. When you move the selection it will sample similar to the Healing Brush tool. To use the Patch Tool, Right click on the toolbox image and Left click the “Patch Tool” command.
Even though there are a few more options for the Patch tool, we felt we did not need to over complicate this area. The 2 most important areas of the Patch tool options bar are:
A). Refer back to the Selecting Image Content or the Magical Colors And Selections tutorials for more explanation about these options. Basically these options allow you to add or subtract or even intersect from a selection you have created.
B). Now you need to select the Patch type. On this example we will be using the “Source” option which tells Photoshop that you want to start with by selecting the bad area first. The other option is “Destination” which tells Photoshop to start with a selection of the good area.
We will be working on the wrinkle that is located between the top lip and the nose to the right hand side (the smile wrinkle). See the specific area below.
To use the Patch Tool, first move your mouse over to the end of the wrinkle at the bottom. Because we have the “Source” selected we need to hold down the Left mouse button and drag around the wrinkle. **When you get towards the top, cut it short and try to stay away from the nose area (we do not want to patch the nose). When you have completed the circle (your back at the starting point), release the Left mouse Button. Now you will see the marching ants showing you the selection. Here is our selection.
Now it is time to patch that area. Move your mouse inside the marching ants (you will see the pointer change). Hold down the Left mouse button and drag it to the right hand side and try to match the skin color. Release the Left mouse button when you found a good area to sample. On our example, we had to patch the area, twice to get it right. Here is our finished image of that area. Not perfect, but pretty darn good with it being zoomed in.
Error Message For The Spot Healing Brush:
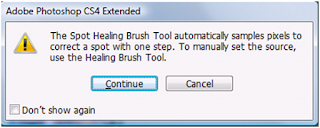
We stated that the Spot Healing Brush does not allow you to sample other areas. Now that you know how to sample areas in the Healing Brush, try to sample an area using the ALT key in the Spot Healing Brush Tool. You will get the following message:
Left click the “Continue” button.
Final Results:
Here is quick final image (10minutes) that we did for this tutorial. Yes, not perfect, but there is a fine line on making the skin to perfect and making it look natural.
Tips And Tricks
Between the Healing Brush and the Patch Tool you can solve most mole, acne, age spot or wrinkle problems. Please note, this is just one use for these tools. We use these tools to get rid of seams or patterns and overall make the blending look better.
If you are working with either the Spot Healing Brush Tool or the Healing Brush Tool, watch out for areas that are extreme changes in color or shading. Example: If you are working on the bags underneath the eyes and get to close to the pupil, it will sample the pupil area and your end result will look awful. The solution to this problem is either to use the Patch Tool or make a selection of the area first. If you make a selection, you are telling Photoshop to not sample outside the selection.
Another tip which we have brought up in this tutorial already, make small strokes or small selections with the Patch Tool. If you try to do a quick job, your end result will look bad.
Remember if you are using the Healing Brush Tool and you have a lot of areas to fix to keep on sampling different areas.
For a final tip, when you are using either Healing Brush or the Spot Healing Brush tools, do not go in the same directions all the time. Also, change the diameter of the brush and of course start small.


No comments
Your Comment Here..!